If you are using PowerBI Service and the PowerBI Data Gateway but are having troubles authenticating to your local machine (i.e. you have an excel or csv file that you want refreshed) this may be the post for you.
I use Office365 and have an @yourcompany.onmicrosoft.com account. That’s also the username to login to my computer. But if you pass xxx@yourcompany.onmicrosoft.com as the username it will not work because it doesn’t know what domain to use.
Instead, you must use this format for the username: azuread\xxx@yourcompany.onmicrosoft.com
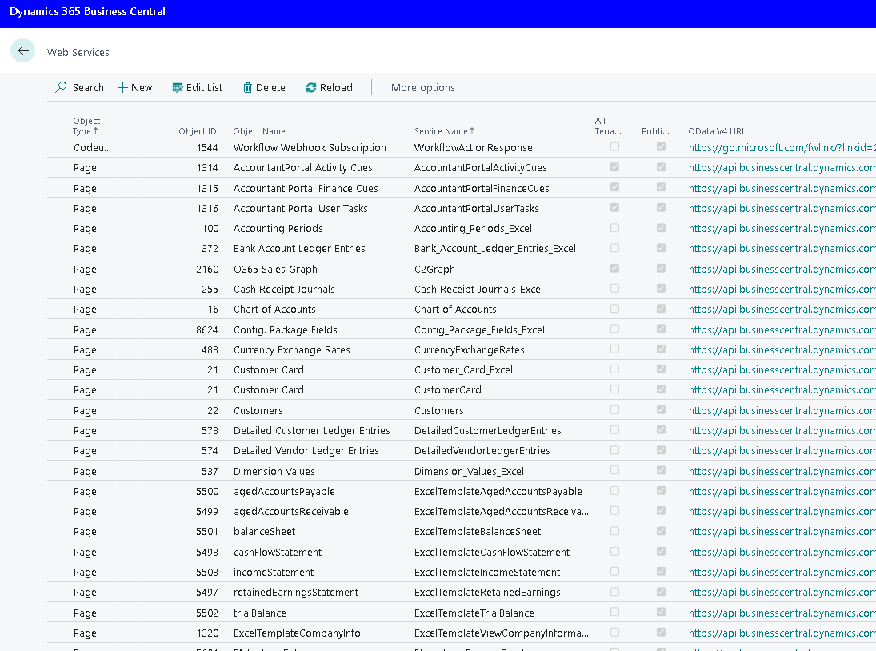
Power Automate has Business Central connectors, however, they are very limited. What Power Automate does not have are connectors to Business Central for the Web Services. You can locate these web services in Business Central under Web Services.
Services listed under Web Services in Business Central
So how can you get access to the Web Services in Power Automate? Not that easy. But I figured it out with some sleuthing and piecing things together. This is a multi-step process and if you do not have admin rights to Azure/Business Central, you may need to contact your IT department to get them.
So the steps (read difficulties) I ran into getting this to work are the following:
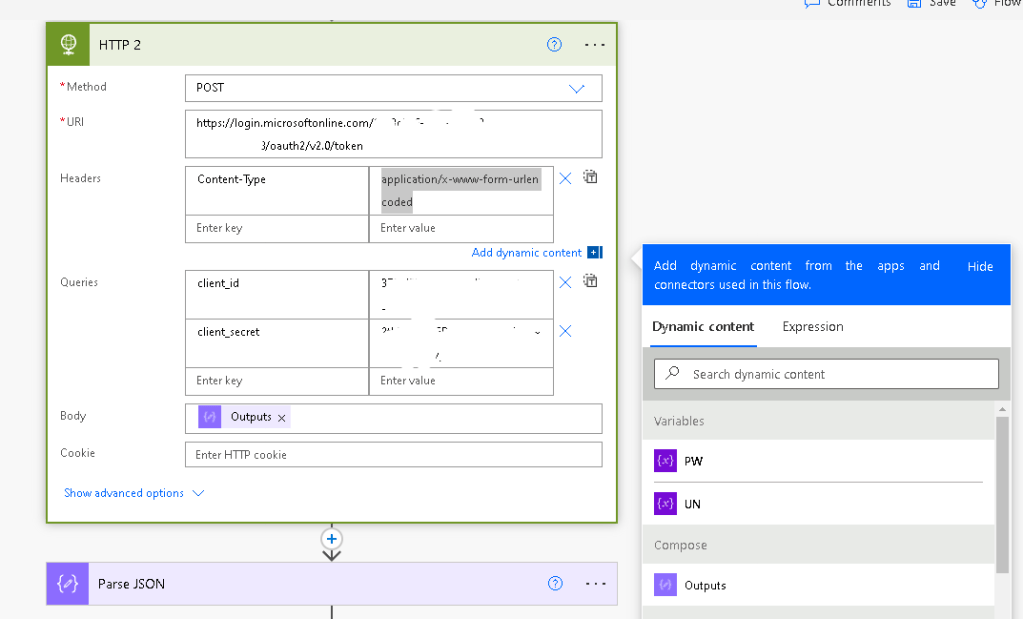
You need to authenticate against Business Central (Microsoft) using oAuth2.0 and get a bearer token
You use the bearer token to call the web service that you need
You get a JSON response
You need to fiddle with the response and the Parse JSON did not work properly for me so I did need to MacGyver some of it
You get variables and you can use them anywhere, in my case, I just wanted to populate an Excel table
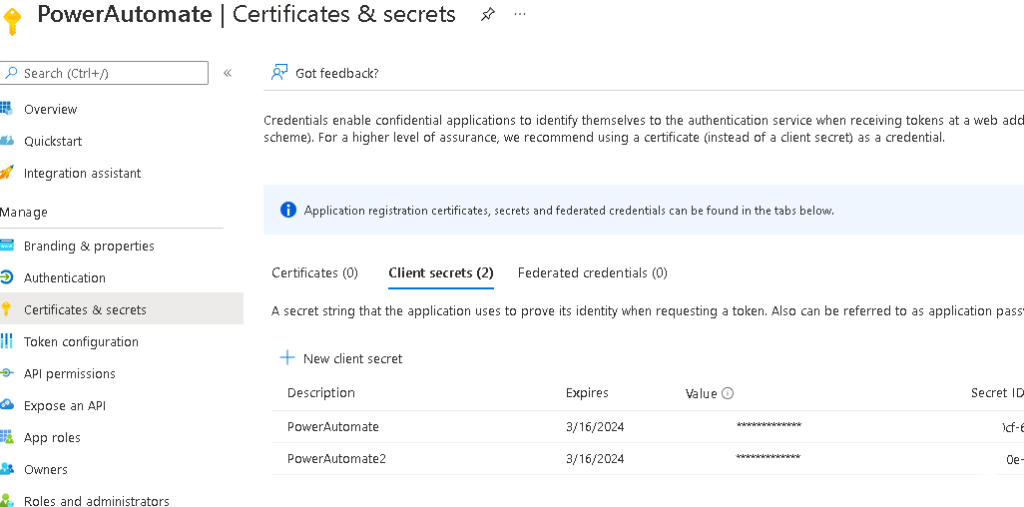
Select Certificates & Secrets and then click on New Client Secret
Remember, you MUST keep the secret (password) as it is shown only this once. But it’s not a big deal, as you can always create another one
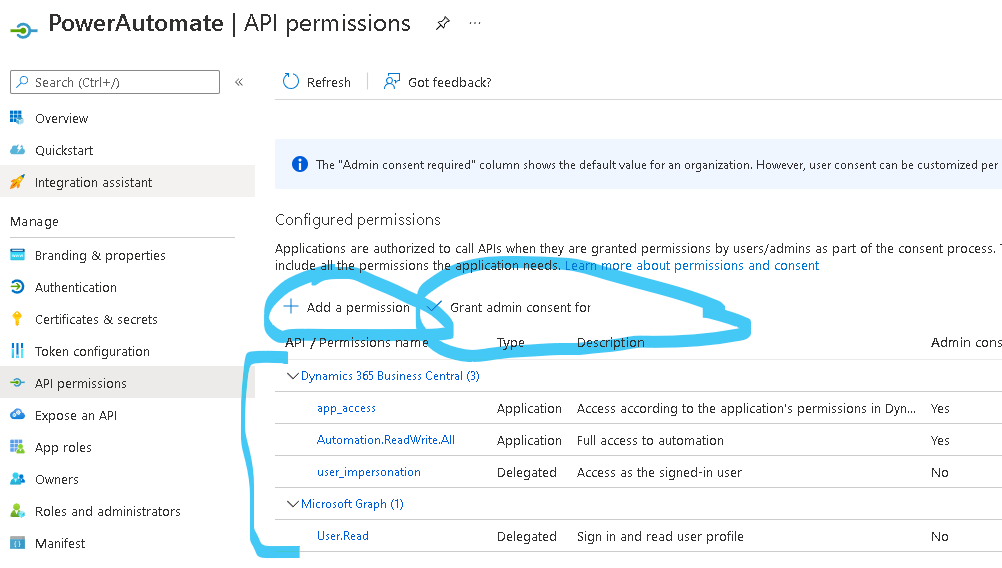
Now click on API permissions and make sure these permissions are added. So click on Add a permission and on the next screen select Microsoft APIs and look for Business Central. Select Business Central and then select DELEGATED PERMISSIONS. I selected app_access/Automation.ReadWrite.All/user_impersonation. I do not believe that you need to Financials.ReadWrite.All.
After you are done that, you need to add another permission but this time, you need to choose Microsoft Graph. The select Delegated Permission and then add USER.READ.
After you have done all that Don’t forget to GRANT ADMIN CONSENT after you add it!
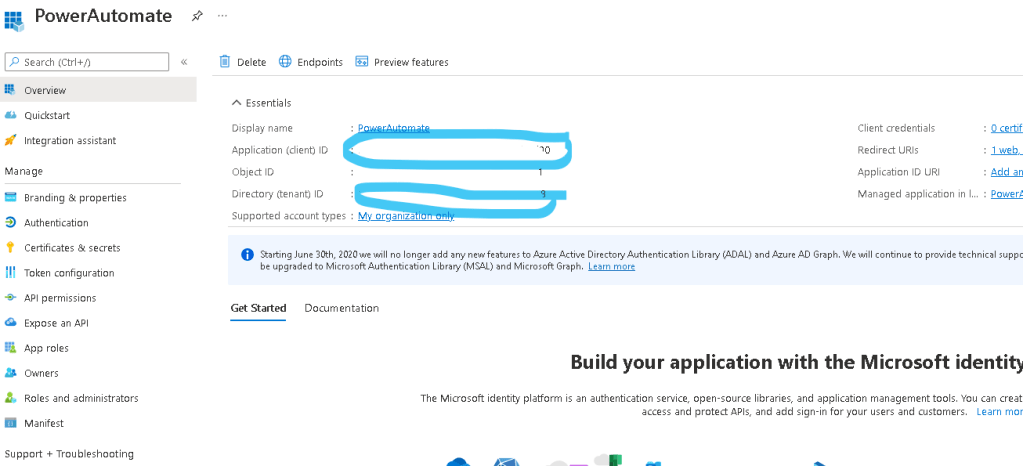
Click on the Overview tab, and make a note of the Client ID and Tenant ID. We will need those in a bit.
Now, go to Power Automate where we will create the create the steps required to access Business Central
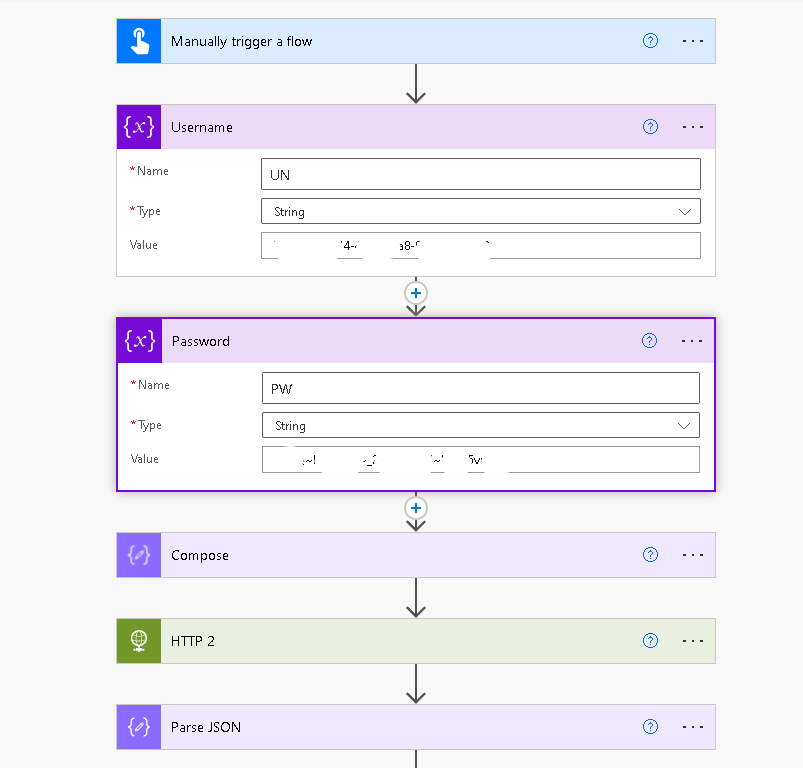
This is a fairly simple process and here is the Power Automate steps that we will require:
Initialize a variable and assign it a name Username or UN. It is a STRING variable and paste the CLIENT ID that you got from Azure into the value field.
Initialize another variable and assign it a name Password or PW. It is also a STRING variable and paste the SECRET (password) that you got from Azure into the value field
Add a new step using COMPOSE. Add this line into the Expression (with all the quotes, but replace XXXX with the Client ID from above and YYYY with the Secret (password) from above:
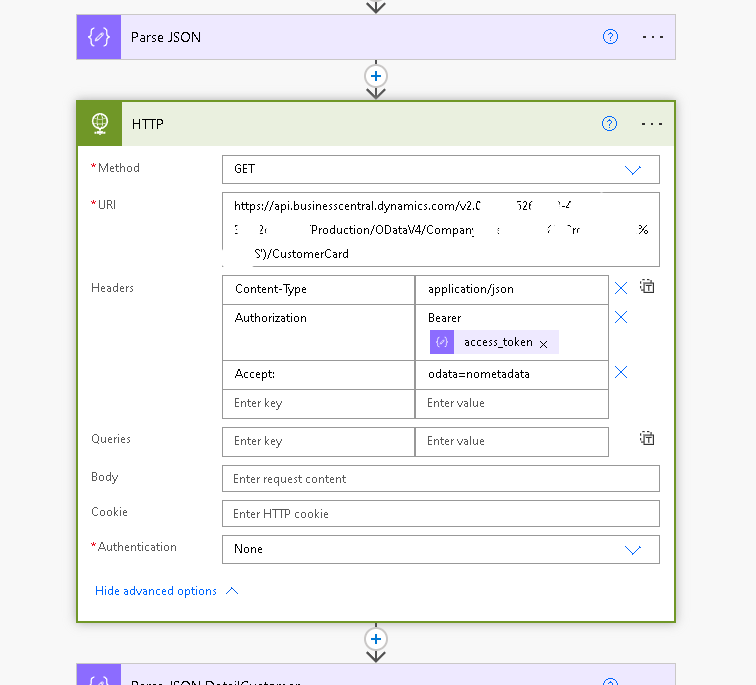
Authorization value to assign Bearer and choose the variable “access token” from our previous step
Accept: value to assign odata=nometadata
Under ADVANCED OPTIONS, choose None for authentication
The step above will return the information to you in a JSON format. In my case, I got the CUSTOMER CARD information from Business Central (this is Page 21)
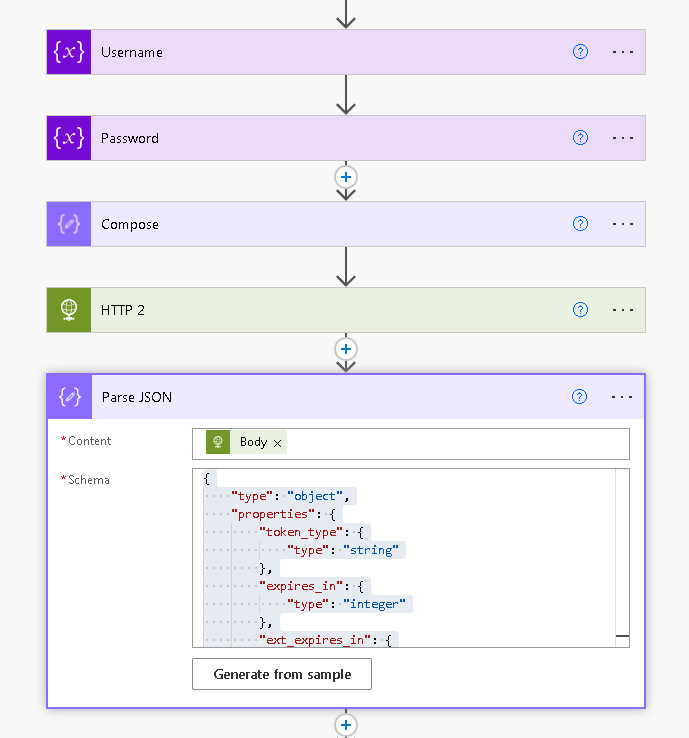
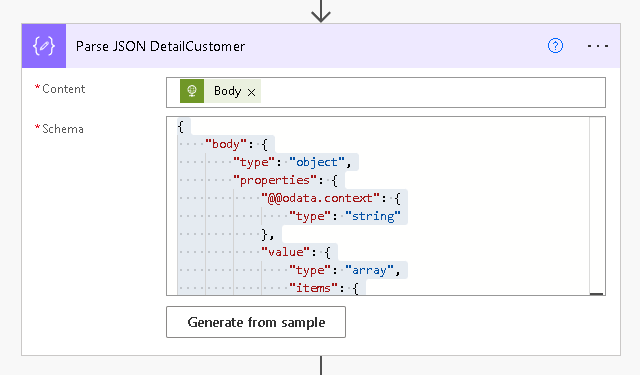
Add another step and use the Parse JSON function. Use the Body from the HTTP request above under CONTENT. Use this as the schema (note you may have additional fields for your customization):
Add a new step and initialize 1 variable for each field that you will require data for. In this case, we will just obtain the Name of the client. So initialize 1 variable and call it Name, type is STRING, and assign it any value for now
Add an Apply to Each step under SELECT AN OUTPUT FROM PREVIOUS STEPS I added this expression: outputs(‘Parse_JSON_DetailCustomer’)?[‘body’]?[‘value’]
Note that I called my Parse JSON step Parse JSON DetailCustomer so remember to add an underscore for all the spaces. You might have named that step something else, so replace the title of that step with yours. If you are at a loss, you can get the title just by looking at the Parse JSON step
Now assign the value to the variable by using the set variable step and using this expression: items(‘Apply_to_each’)?[‘Name’] Note that the Apply_to_each is the title for this step
Once you have assigned the variable, you can use it anywhere!
This entire process was frustrating on many levels. Microsoft documentation is about as good if it were written in an alien language (why is that?). There is great information about oAuth2.0 authentication (but only after spending hours looking) and not a great deal on Parse JSON. I ran into days of frustration when I kept on getting object not array errors, or null errors. In any event, this worked for me, and I hope it works for you.
If you are like me and do a lot of importing and sorting and just want data at your fingertips without having to go through Business Central, you like to have data either in SQL or in Excel. Why? Because you can do xlookups or other necessary evils when creating import tables with configuration packages or other automation.
So how do you go about getting the data into Excel? You can use PowerAutomate with Business Central.
I will show you the steps that I had to take to do this.
Step 1: Use the Business Central Connector in PowerAutomate and use the FIND RECORDS (V3). You will need to input the Environment Name (usually Production) and then the company name. Use the API v2.0, and for my case, I used the customers table.
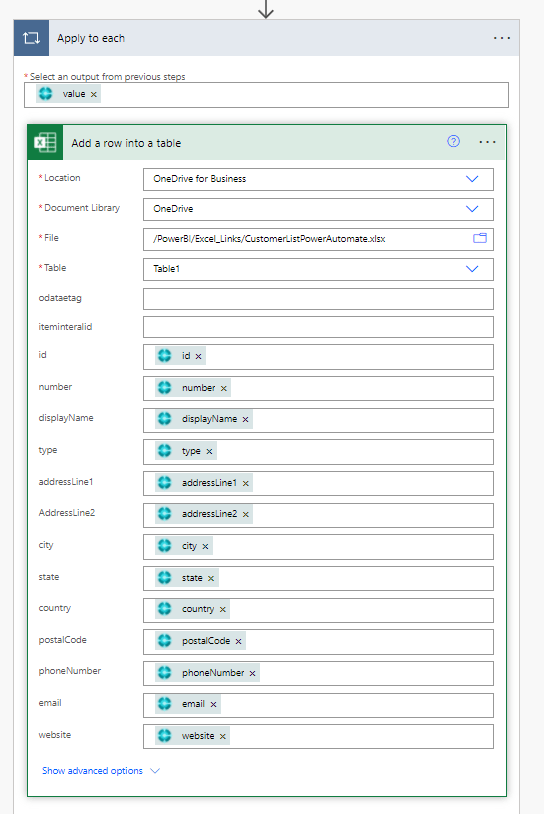
Step 2: Add another step, APPLY TO EACH and use the output from the previous step. Choose the one that says VALUE (List of items). Then select EXCEL ONLINE BUSINESS > ADD A ROW INTO A TABLE and work your way through to the Excel file that you created for this. Remember, your data MUST sit in a table in Excel, so you have to formulate this first. Your flow should look like this, but your table may look different from mine.
Simply go through the different headers in your excel file and simply plop down the the data that you need for each one. You will have an excel file that looks like this in the end (I have obfuscated the confidential data)
The Master Calendar is super important in PowerBI, especially if you want to run reports using relative dates or a series in time. Essentially all tables, should be linked to your master calendar via the date field.
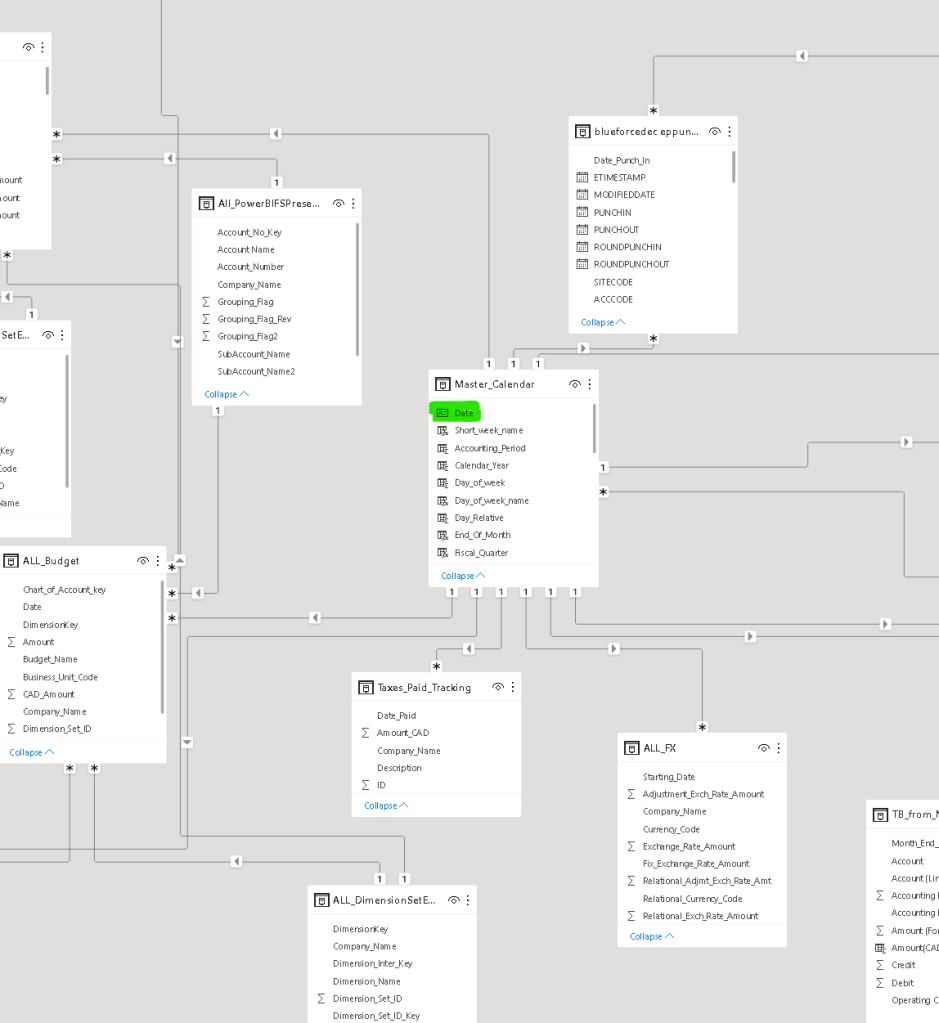
This is what PowerBI looks like when the dates are all joined. You should use the date field to connect to other date fields. It is usually a 1 to many relationship.
Master Calendar
The Master Calendar is important, especially for financial reporting because you can create columns that indicate fiscal year, fiscal period, week number, year, year to date flags, next month, last twelve months and so forth. Here is a Master Calendar that I created:
This Master Calendar includes the day relative to today, month relative to today, day of the week in words, fiscal year (which is different from the calendar year), fiscal quarter, accounting period (as a number), week number (relative to the calendar), weekday or weekend and so forth.
The Master Calendar allows you to use slicers to filter out data automatically. This is very important when creating financial reports that are a point in time, such as the balance sheet vs income statement which is a period of time. It is exceptionally useful when running trial balance data. If you are short on time, you can just use the steps below to create the Master Calendar in PowerBI:
Click on NEW TABLE (name the table Master_Calendar)
Make sure you mark the table as a date table by clicking on DATE TABLE
Then start by adding this column
Your first column is a column of dates automatically generated by PowerBI:
DATE=(CALENDAR(START DATE,TODAY())
Note, you can add to the number of days beyond today() by simply putting a + and the number of days you want to go beyond today. Like this:
You should have a Master_Calendar table similar to the one I have. This is a very important step to creating financial reporting (or other time based reporting in PowerBI.
Please note that the fiscal year in this examples starts on Aug 1. If you want to change the fiscal year start date simply change items 5, 6 and 7 to your corresponding fiscal year to the period.
We wanted to see all of the foreign exchange rates in Power BI from Business Central for various reasons: 1) To make sure the exchange rates were being updated daily and, 2) to run reports on the exchange rates
Business Central stores the FX rates in table
To create the API, go to WEB SERVICES in Business Central and select NEW. The object type is page, and use Object ID 483 and publish. The URL will be produced and you use that as the oData source in PowerBI.
This piece of wood was in pretty bad shape. I managed to stabilize it with PC Wood Hardener and epoxy. The rotting portion was very much a sponge. It sucked up about 3 bottles of wood hardener and lots of epoxy and varnish.
Here is an over exposed picture of the piece of wood.
I used a hand plane to plane the surface of the table flat. I then realized the right side of the wood was going to fall off due to the rot.
Close up of the rotting woodAfter planing over several days
I don’t typically like the epoxy effects that some people do, so I strictly wanted the epoxy to be structural and not a feature. I mixed in some deep red dye so that it would not be entirely noticeable.
I sanded down the epoxy so it would only show up where it was needed and not on the rest of the table top itself.
I had to make legs for this thing. I noticed some cool joins that welders do, so I tried one myself.
Figuring out the measurements is relatively easy. It’s a quarter circle, so the distance of the cuts is 3.14 x the height (or width of the steel – let’s say it is about 2″ x 4″, then the diameter is 8″ because 4″ x 2) all of that divided by 4. So Pi x D / 4.
Because the bottom of the wood was not planed to the same thickness, I had to improvise on the legs. I made one of the legs adjustable for level.
I wanted a really simply way to access the tables in Business Central and to write the information of those tables into SQL database so that my team could access them directly from SQL.
Since I am just an accountant, I always find it very difficult when I find snippets of code but nothing is explained. So I will try my best to break everything down for other fellow accountants so that they can follow through.
Sure, there are many ways to do this, but I just wanted to try this. So here is my script. You can copy this script directly, and there are just a few things for you to change. Any thing that is underlined you will need to change.
#  References.
#  https://docs.microsoft.com/en-us/azure/active-directory/develop/v1-protocols-oauth-code
#  https://www.reddit.com/r/PowerShell/comments/9clts3/powershell_automation_with_oauth2/
#

#
# https://login.windows.net/2383c526-aef3-47e9-8487-37712e689168/oauth2/token?resource=https://api.businesscentral.dynamics.com

# Class to get an OAuth 2.0 authentication token from BC using a Password Grant.
#
class AADPasswordGrant {
    [string]$token                  #Token that we need to get to Authenticate with later
    [string]$tenantId               #BC Tenant ID
    [string]$clientId               #The ApplicationId that was registed for BC in AAD.
    [string]$username               #BC username
    [string]$password               #BC Password
    [System.Security.SecureString]$securePasswordStr #BC Password we will convert to a secure string later
    [string]$securePasswordBStr     #BSTR version of the secure password
    [string]$clientSecret           #Key that was generated when registring BC in AAD
    [string]$grantType      = "password"  #This must be password so we are not challenged or have to use a form.
    [string]$callbackUrl    = "https://127.0.0.1/auth-response"              #The same callback registered for BC in AAD
    [string]$accessTokenUrl = "https://login.windows.net/{tenantId}/oauth2/token"  #Url to request the token from
    [string]$resourceUrl    = "https://api.businesscentral.dynamics.com"           #The resource we want to talk to
    [string]$scopeUrl       = "https://api.businesscentral.dynamics.com"           #The resource we want to talk to

    AADPasswordGrant([string]$tenandId, [string]$clientId, [string]$clientSecret, [string]$userName, [string]$password) {
        $this.tenantId     = $tenandId
        $this.clientId     = $clientId
        $this.clientSecret = $clientSecret
        $this.userName     = $userName
        $this.securePasswordStr  = (ConvertTo-SecureString -String $password -AsPlainText -Force)
        $this.securePasswordBStr = [System.Runtime.InteropServices.Marshal]::PtrToStringAuto([System.Runtime.InteropServices.Marshal]::SecureStringToBSTR($this.securePasswordStr))
        $this.accessTokenUrl     = $this.accessTokenUrl.Replace('{tenantId}', $tenandId)
    }

    [void]TryGetAuthorisationToken () {
        $body = @{
            grant_type    = $this.grantType
            username      = $this.userName
            password      = $this.securePasswordBStr
            client_id     = $this.clientId
            client_secret = $this.clientSecret
            scope         = $this.scopeUrl
            redirect_uri  = $this.callbackUrl
            resource      = $this.resourceUrl
        }
        $authResult = Invoke-RestMethod -Method Post -Uri $this.accessTokenUrl -Body $body
        $this.token =$authResult.access_token
    }
}

#
# Test the Class Here
#
$tenantId     = '1447d526-aee2-47e9-8418-27732e6848546'      #Your BC tennantID
$clientId     = 'af912c1d-d67c-407a-8f5f-2bd8dbb1cda9'      #The id that BC is registered with in AAD
$clientSecret = 'ETZ9Nqy--Wi9-zjF9B97-.oeCLyA0.AEfd' #The secret key that was created when registering BC for AAD Auth
$username     = 'xx@xxx.com'            #Username for the password grant -- this is usually your Office365 credentials
$password     = 'your office365 password'                       #Password in plain text note.. this is not advised and there are ways of producing a key in PowerShell so your password is not stored in plain text

[AADPasswordGrant]$aadPasswordGrant = [AADPasswordGrant]::new($tenantId, $clientId, $clientSecret, $username, $password)
$aadPasswordGrant.TryGetAuthorisationToken()

$companiesUrl = "https://api.businesscentral.dynamics.com/v2.0/Production/api/v2.0"
$requestHeaders = @{ 'Authorization' = 'Bearer ' + $aadPasswordGrant.token }
$result = Invoke-RestMethod -Uri $companiesUrl -Headers $requestHeaders -Method Get
$result.value | Export-Csv -Path c:\output\bc-environment.csv
A few things to note about our environment:
We are running Business Central (SAAS/Online – it’s in Office365 not our own servers
We use AAD (Azure Active Directory) to authenticate – that is we use our Office365 credentials to login to Business Central (I am using the OAuth2.0 token to gain access to Business Central
The code above is accessing the PRODUCTION platform.
Most of the code above is just to get the OAuth 2.0 token to get access to Business Central. Why is it not simply a username and password? I’m not sure, and this is what Microsoft requires to access Business Central. Like I said, I’m not a coder, just an accountant.
There are 5 pieces of information that you need to change in the above code (and you might not be able to get all of them yourself):
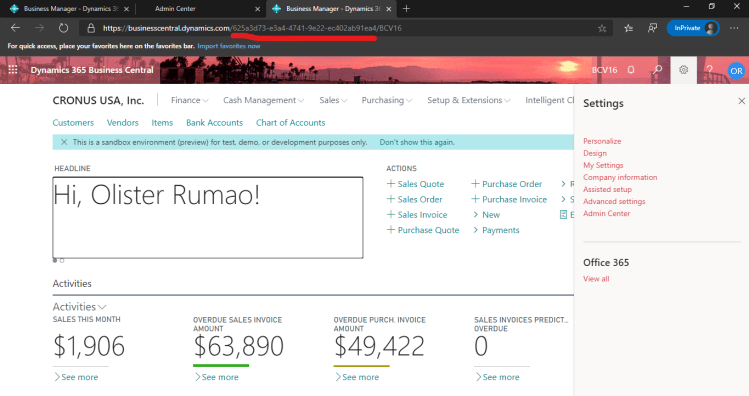
Tenant ID – You can get this by going to Business Central with your browser and clicking on Help and Support. You will find your Tenant ID. If you don’t see it, you can always get it from your URL.